Guia de Up: diferenças entre revisões
Sem resumo de edição |
Sem resumo de edição |
||
| (Há 2 revisões intermédias de 2 utilizadores que não estão a ser apresentadas) | |||
| Linha 18: | Linha 18: | ||
<center> | <center> | ||
{| class="wikitablew-tr mw-collapsible mw-collapsed" style="width:80%" ; | |||
{| class="mw-collapsible mw-collapsed" style="background-color:# | ! colspan="7" style="background-color:#d5e3ff;" |Nv. 1 à 50 | ||
! style="background-color:# | |- | ||
! style="background-color:#d5e3ff; text-align: center; width:10%" |Nível | |||
! style="background-color:#d5e3ff; text-align: center; width:10%" |Onde Upar | |||
! colspan="5" style="background-color:#d5e3ff; text-align: center;" |Mobs | |||
|- | |- | ||
'''Caso você tenha o item {{Item List4|id=412|item=Medicina Milagrosa|simple=yes}} é possível chegar no nível de base 100+ rápidamente.''' | |||
! rowspan="2" |1 ~ 50 | |||
! Campo de Aprendiz | |||
| style="vertical-align:bottom; text-align:center" |{{Monstro|id=1002|monstro=<br>Poring}}{{monster|id=1002 Poring}} | |||
| style="vertical-align:bottom; text-align:center" | {{Monstro|id=1063|monstro=<br>Lunático}}{{monster|id=1063 Lunático}} | |||
| colspan="3" | | |||
|{{Monstro |id= | |||
|- | |||
|{{Monstro |id= | |||
| | |||
| | |||
| | |||
|- | |- | ||
|{{Monstro |id= | !Formigueiro Infernal | ||
| | | style="vertical-align:bottom; text-align:center" |{{Monstro|id=1097|monstro=<br>Ovo de Andre}}{{monster|id=1097 Ovo de Andre}} | ||
|{{monster|id=1176 Vitata}} | | style="vertical-align:bottom; text-align:center" |{{Monstro|id=1105|monstro=<br>Deniro}}{{monster|id=1105 Deniro}} | ||
| style="vertical-align:bottom; text-align:center" |{{Monstro|id=1160|monstro=<br>Piere}}{{monster|id=1160 Piere}} | |||
| style="vertical-align:bottom; text-align:center" |{{Monstro|id=1095|monstro=<br>Andre}}{{monster|id=1095 Andre}} | |||
| style="vertical-align:bottom; text-align:center" |{{Monstro|id=1176|monstro=<br>Vitata}}{{monster|id=1176 Vitata}} | |||
|} | |} | ||
{| class="wikitable mw-collapsible mw-collapsed wikitablew-tr" style="width:80%" ; | |||
! colspan="5" style="background-color:#d5e3ff;" |Nv. 50 à 70 | |||
{| class="wikitablew-tr" style="width: | |||
! | |||
| | |||
|- | |- | ||
| | ! style="background-color:#d5e3ff; text-align: center; width:10%" |Nível | ||
| | ! style="background-color:#d5e3ff; text-align: center; width:10%" |Onde Upar | ||
| | ! colspan="3" style="background-color:#d5e3ff; text-align: center;" |Mobs | ||
|- | |- | ||
|{{Monstro |id= | ! rowspan="2" |50 ~ 70 | ||
| | !Caverna dos Orcs 2 | ||
|{{monster|id= | | style="vertical-align:bottom; text-align:center" |{{Monstro|id=1152|monstro=<br>Orc Esqueleto}}{{monster|id=1152 Orc Esqueleto}} | ||
| style="vertical-align:bottom; text-align:center" |{{Monstro|id=1177|monstro=<br>Zenorc}}{{monster|id=1177 Zenorc}} | |||
| style="vertical-align:bottom; text-align:center" |{{Monstro|id=1153|monstro=<br>Orc Zumbi}}{{monster|id=1153 Orc Zumbi}} | |||
|- | |- | ||
|{{Monstro |id= | !Deserto de Sograt 16 | ||
| | | style="vertical-align:bottom; text-align:center" |{{Monstro|id=1119|monstro=<br>Frilldora}}{{monster|id=1119 Frilldora}} | ||
|{{monster|id= | | style="vertical-align:bottom; text-align:center" |{{Monstro|id=1165|monstro=<br>Arenoso}}{{monster|id=1165 Arenoso}} | ||
| style="vertical-align:bottom; text-align:center" |{{Monstro|id=1127|monstro=<br>Hode}}{{monster|id=1127 Hode}} | |||
|} | |} | ||
{| class="wikitable mw-collapsible mw-collapsed wikitablew-tr" style="width:80%" ; | |||
! colspan="5" style="background-color:#d5e3ff;" |Nv. 70 à 130 | |||
{| class="mw-collapsible mw-collapsed" style=" | |||
! style="background-color:# | |||
|- | |- | ||
| | ! style="background-color:#d5e3ff; text-align: center; width:10%" |Nível | ||
! style="background-color:#d5e3ff; text-align: center; width:10%" |Onde Upar | |||
! colspan="3" style="background-color:#d5e3ff; text-align: center;" |Mobs | |||
|- | |- | ||
! rowspan=" | ! rowspan="2" |70 ~ 100 | ||
|{{Monstro |id= | !Carna de Payon bRO | ||
| style="vertical-align:bottom; text-align:center" |{{Monstro|id=1193|monstro=<br>Alarme}}{{monster|id=1193 Alarme}} | |||
| style="vertical-align:bottom; text-align:center" |{{Monstro|id=1627|monstro=<br>Anopheles}}{{monster|id=1627 Anopheles}} | |||
|- | |- | ||
|{{Monstro |id= | !Carna de Payon iRO | ||
| | | style="vertical-align:bottom; text-align:center" |{{Monstro|id=1201|monstro=<br>Rybio}}{{monster|id=1201 Rybio}} | ||
|{{monster|id= | | style="vertical-align:bottom; text-align:center" |{{Monstro|id=1386|monstro=<br>Rochoso}}{{monster|id=1386 Rochoso}} | ||
|- | |- | ||
|{{Monstro |id= | ! rowspan="2" |101 ~ 125 | ||
| | !Calabouço de Geffen bRO | ||
|{{monster|id= | | style="vertical-align:bottom; text-align:center" |{{Monstro|id=1291|monstro=<br>Aparição}}{{monster|id=1291 Aparição}} | ||
| style="vertical-align:bottom; text-align:center" |{{Monstro|id=1098|monstro=<br>Anubis}}{{monster|id=1098 Anubis}} | |||
|- | |- | ||
|{{Monstro |id= | !Calabouço de Geffen iRO | ||
| style="vertical-align:bottom; text-align:center" |{{Monstro|id=1735|monstro=<br>Alicel}}{{monster|id=1735 Alicel}} | |||
| style="vertical-align:bottom; text-align:center" |{{Monstro|id=1772|monstro=<br>Isilla}}{{monster|id=1772 Isilla}} | |||
|- | |- | ||
| | ! rowspan="2" |126 ~ 150 | ||
!Lago do Abismo bRO | |||
= | | style="vertical-align:bottom; text-align:center" |{{Monstro|id=1309|monstro=<br>Gajomart}}{{monster|id=1309 Gajomart}} | ||
| style="vertical-align:bottom; text-align:center" |{{Monstro|id=2369|monstro=<br>Lichtern Kenaz}}{{monster|id=2369 Lichtern Kenaz}} | |||
|- | |- | ||
! | !Lago do Abismo iRO | ||
| style="vertical-align:bottom; text-align:center" |{{Monstro|id=1986|monstro=<br>Tatacho}}{{monster|id=1986 Tatacho}} | |||
| style="vertical-align:bottom; text-align:center" |{{Monstro|id=2021|monstro=<br>Phylla}}{{monster|id=2021 Phylla}} | |||
| | |||
|{{Monstro |id= | |||
| | |||
| | |||
|{{Monstro |id= | |||
| | |||
|} | |} | ||
{| class="wikitable mw-collapsible mw-collapsed wikitablew-tr" style="width:80%" ; | |||
! colspan="8" style="background-color:#d5e3ff;" |Nv. 130 à 170 | |||
{| class="wikitablew-tr" style="width: | |||
|- | |- | ||
! | ! style="background-color:#d5e3ff; text-align: center; width:10%" |Nível | ||
! style="background-color:#d5e3ff; text-align: center; width:10%" |Onde Upar | |||
! colspan="6" style="background-color:#d5e3ff; text-align: center;" |Mobs | |||
| | |||
|- | |- | ||
|{{Monstro |id= | ! rowspan="2" |130~170 | ||
| | !Large Bath | ||
|{{monster|id= | | style="vertical-align:bottom; text-align:center" |{{Monstro|id=20644|monstro=<br>Boiled Water Marc}}{{monster|id=20644 Boiled Water Marc}} | ||
| style="vertical-align:bottom; text-align:center" |{{Monstro|id=20645|monstro=<br>Boiled Water Swordfish}}{{monster|id=20645 Boiled Water Swordfish}} | |||
| style="vertical-align:bottom; text-align:center" |{{Monstro|id=20646|monstro=<br>Boiled Water Piranha}}{{monster|id=20647 Boiled Water Piranha}} | |||
| style="vertical-align:bottom; text-align:center" |{{Monstro|id=20643|monstro=<br>Boiled Water Phen}}{{monster|id=20643 Boiled Water Phen}} | |||
| style="vertical-align:bottom; text-align:center" |{{Monstro|id=20633|monstro=<br>Broken Cleaner}}{{monster|id=20633 Broken Cleaner}} | |||
| style="vertical-align:bottom; text-align:center" |{{Monstro|id=20634|monstro=<br>Broken Cleaner}}{{monster|id=20634 Broken Cleaner}} | |||
|- | |- | ||
|{{Monstro |id= | !Illusion of Underwater 01 | ||
| | (Quests e Mobs) | ||
|{{monster|id= | | style="vertical-align:bottom; text-align:center" |{{Monstro|id=20801|monstro=<br>Deep Sea Sropho}}{{monster|id=20801 Deep Sea Sropho}} | ||
| | | style="vertical-align:bottom; text-align:center" |{{Monstro|id=20805|monstro=<br>Deep Sea Merman}}{{monster|id=20805 Deep Sea Merman}} | ||
=== | | style="vertical-align:bottom; text-align:center" |{{Monstro|id=20802|monstro=<br>Deep Sea Obeaune}}{{monster|id=20802 Deep Sea Obeaune}} | ||
| style="vertical-align:bottom; text-align:center" |{{Monstro|id=20804|monstro=<br>Deep Sea Marse}}{{monster|id=20804 Deep Sea Marse}} | |||
| style="vertical-align:bottom; text-align:center" |{{Monstro|id=20803|monstro=<br>Deep Sea Deviace}}{{monster|id=20803 Deep Sea Deviace}} | |||
|- | |- | ||
|} | |} | ||
{| class="wikitable mw-collapsible mw-collapsed wikitablew-tr" style="width:80%" ; | |||
! colspan="10" style="background-color:#d5e3ff;" |Nv. 130+ | |||
{| class="mw-collapsible mw-collapsed" style=" | |||
! style="background-color:# | |||
|- | |- | ||
! | ! style="background-color:#d5e3ff; text-align: center; width:10%" |Nível | ||
! style="background-color:#d5e3ff; text-align: center; width:10%" |Onde Upar | |||
! | ! colspan="10" style="background-color:#d5e3ff; text-align: center;" |Mobs | ||
! | |||
|- | |- | ||
! rowspan="2" | | ! rowspan="2" |130~170 | ||
|{{Monstro |id= | !Carva de Magma (3) | ||
| | | style="vertical-align:bottom; text-align:center" |{{Monstro|id=20376|monstro=<br>Explosão}}{{monster|id=20376 Explosão}} | ||
|{{monster | id= | | style="vertical-align:bottom; text-align:center" |{{Monstro|id=20375|monstro=<br>Deleter}}{{monster|id=20375 Deleter}} | ||
| style="vertical-align:bottom; text-align:center" |{{Monstro|id=20377|monstro=<br>Kaho Torrente}}{{monster|id=20377 Kaho Torrente}} | |||
| style="vertical-align:bottom; text-align:center" |{{Monstro|id=20374|monstro=<br>Deleter Voador}}{{monster|id=20374 Deleter Voador}} | |||
| style="vertical-align:bottom; text-align:center" |{{Monstro|id=20378|monstro=<br>Golem de Magma}}{{monster|id=20378 Golem de Magma}} | |||
| style="vertical-align:bottom; text-align:center" |{{Monstro|id=20372|monstro=<br>Brasa}}{{monster|id=20372 Brasa}} | |||
| style="vertical-align:bottom; text-align:center" |{{Monstro|id=20373|monstro=<br>Pesadelo Sinistro}}{{monster|id=20373 Pesadelo Sinistro}} | |||
| style="vertical-align:bottom; text-align:center" |{{Monstro|id=20419|monstro=<br>Muspellskoll}}{{monster|id=20419 Muspellskoll}} | |||
'''MVP''' | |||
|- | |- | ||
|} | |} | ||
A partir do nível 170+ você pode realizar as instâncias '''[[Old Glast Heim Challenge]]''' e '''[[EDDA Bioresearch Laboratory|Edda Bio Lab]]''' pelo '''gerenciador de instâncias'''. ('''Não esqueça de dar o @classe no nível 200''', geralmente você termina as instâncias proximo do Nv. 230) | |||
{| class="wikitable mw-collapsible mw-collapsed wikitablew-tr" style="width:80%" ; | |||
! colspan="13" style="background-color:#d5e3ff;" |Nv. 230+ | |||
{| class="wikitablew-tr" style="width: | |||
! | |||
| | |||
|- | |- | ||
| | ! style="background-color:#d5e3ff; text-align: center; width:10%" |Nível | ||
| | ! style="background-color:#d5e3ff; text-align: center; width:10%" |Onde Upar | ||
! colspan="11" style="background-color:#d5e3ff; text-align: center;" |Mobs | |||
|- | |- | ||
||{{Monstro |id= | !rowspan="2" |230+ | ||
| | !Niflheim Pumpkin Farm | ||
|< | (requer Nv. 230) | ||
| style="vertical-align:bottom; text-align:center" |{{Monstro|id=22383|monstro=<br>Violen}}{{monster|id=22383 Violen}} | |||
| style="vertical-align:bottom; text-align:center" |{{Monstro|id=22384|monstro=<br>Violen}}{{monster|id=22384 CP_Violen}} | |||
| style="vertical-align:bottom; text-align:center" |{{Monstro|id=22385|monstro=<br>Spiding}}{{monster|id=22385 Spiding}} | |||
| style="vertical-align:bottom; text-align:center" |{{Monstro|id=22386|monstro=<br>Spiding}}{{monster|id=22386 CP_Spiding}} | |||
| style="vertical-align:bottom; text-align:center" |{{Monstro|id=22387|monstro=<br>Garling}}{{monster|id=22387 Garling}} | |||
| style="vertical-align:bottom; text-align:center" |{{Monstro|id=22388|monstro=<br>Garling}}{{monster|id=22388 CP_Garling}} | |||
| style="vertical-align:bottom; text-align:center" |{{Monstro|id=22389|monstro=<br>Jackonette}}{{monster|id=21952 Jackonette}} | |||
| style="vertical-align:bottom; text-align:center" |{{Monstro|id=22390|monstro=<br>Jackonette}}{{monster|id=22390 CP_Jackonette}} | |||
| style="vertical-align:bottom; text-align:center" |{{Monstro|id=22391|monstro=<br>Liamette}}{{monster|id=22391 Liamette}} | |||
| style="vertical-align:bottom; text-align:center" |{{Monstro|id=22392|monstro=<br>Liamette}}{{monster|id=22392 CP_Liamette}} | |||
| style="vertical-align:bottom; text-align:center" |{{Monstro|id=22394|monstro=<br>Nightmare Piamette}}{{monster|id=22394 Nightmare Piamette}} | |||
'''MVP''' | |||
|- | |- | ||
|} | |} | ||
{| class="wikitable mw-collapsible mw-collapsed wikitablew-tr" style="width:80%" ; | |||
{| class="wikitablew-tr" style="width: | ! colspan="10" style="background-color:#d5e3ff;" |Nv. 170 à 180 | ||
|- | |- | ||
! | ! style="background-color:#d5e3ff; text-align: center; width:10%" |Nível | ||
! style="background-color:#d5e3ff; text-align: center; width:10%" |Onde Upar | |||
! colspan="8" style="background-color:#d5e3ff; text-align: center;" |Mobs | |||
| | |||
|- | |- | ||
|<center>{{Monstro |id= | !rowspan="3" |170 à 180 | ||
| | !Illusion of Labyrinth | ||
|{{monster|id= | (Lembre-se de pegar a quest no livro de ouro) | ||
| style="vertical-align:bottom; text-align:center" |{{Monstro|id=20532|monstro=<br>Chaotic Stem Worm}}{{monster|id=20532 Chaotic Stem Worm}} | |||
| style="vertical-align:bottom; text-align:center" |{{Monstro|id=20529|monstro=<br>Chaos Ghostring}}{{monster|id=20529 Chaos Ghostring}} | |||
| style="vertical-align:bottom; text-align:center" |{{Monstro|id=20531|monstro=<br>Chaos}}{{monster|id=20531 Chaos}} | |||
| style="vertical-align:bottom; text-align:center" |{{Monstro|id=20528|monstro=<br>Chaos Mantis}}{{monster|id=20528 Chaos Mantis}} | |||
| style="vertical-align:bottom; text-align:center" |{{Monstro|id=20527|monstro=<br>Chaos Hunter Fly}}{{monster|id=20527 Chaos Hunter Fly}} | |||
| style="vertical-align:bottom; text-align:center" |{{Monstro|id=20526|monstro=<br>Chaos Side Winder}}{{monster|id=20526 Chaos Side Winder}} | |||
| style="vertical-align:bottom; text-align:center" |{{Monstro|id=20525|monstro=<br>Chaos Baphomet Jr.}}{{monster|id=20525 Chaos Baphomet Jr.}} | |||
| style="vertical-align:bottom; text-align:center" |{{Monstro|id=20530|monstro=<br>Chaos Killer Mantis}}{{monster|id=20530 Chaos Killer Mantis}} | |||
|- | |- | ||
|< | !Rachel Oz Gorge | ||
| | | style="vertical-align:bottom; text-align:center" |{{Monstro|id=21324|monstro=<br>Grey Goat}}{{monster|id=21324 Grey Goat}} | ||
|{{monster|id= | |{{Monstro|id=21323 |monstro=<br>Rake Hand}}{{monster|id=21323 Rake Hand}} | ||
|{{Monstro|id=21296 |monstro=<br>Rake Hand}}{{monster|id=21296 Rake Hand}} | |||
| colspan="5" | | |||
|- | |- | ||
|{{Monstro |id= | !Illusion of Underwater 02 | ||
| | (Quests e Mobs) | ||
|{{monster|id= | | style="vertical-align:bottom; text-align:center" |{{Monstro|id=20806|monstro=<br>Deep Sea Sedora}}{{monster|id=20806 Deep Sea Sedora}} | ||
|- | | style="vertical-align:bottom; text-align:center" |{{Monstro|id=20807|monstro=<br>Deep Sea Swordfish}}{{monster|id=20807 Deep Sea Swordfish}} | ||
|{{Monstro |id= | | style="vertical-align:bottom; text-align:center" |{{Monstro|id=20808|monstro=<br>Deep Sea Strouf}}{{monster|id=20808 Deep Sea Strouf}} | ||
| | | style="vertical-align:bottom; text-align:center" |{{Monstro|id=20809|monstro=<br>Deep Sea Phen}}{{monster|id=20809 Deep Sea Phen}} | ||
|{{monster|id= | | style="vertical-align:bottom; text-align:center" |{{Monstro|id=20810|monstro=<br> Deep Sea King Dramoh}}{{monster|id=20810 Deep Sea King Dramoh}} | ||
| colspan="3" | | |||
|} | |} | ||
{| class="wikitable mw-collapsible mw-collapsed wikitablew-tr" style="width:80%" ; | |||
! colspan="10" style="background-color:#d5e3ff;" |Nv. 180 à 200 | |||
{| class="wikitablew-tr" style="width: | |||
|- | |- | ||
! | ! style="background-color:#d5e3ff; text-align: center; width:10%" |Nível | ||
! style="background-color:#d5e3ff; text-align: center; width:10%" |Onde Upar | |||
| | ! colspan="8" style="background-color:#d5e3ff; text-align: center;" |Mobs | ||
|- | |- | ||
|{{Monstro |id= | !180 à 200 | ||
| | !Odin's Past | ||
| | (requer Nv. 170) | ||
|- | | style="vertical-align:bottom; text-align:center" |{{Monstro|id=20604|monstro=<br>Angelgolt}}{{monster|id=20604 Angelgolt}} | ||
| {{Monstro |id= | | style="vertical-align:bottom; text-align:center" |{{Monstro|id=20605|monstro=<br>Angelgolt}}{{monster|id=20605 Angelgolt}} | ||
| | | style="vertical-align:bottom; text-align:center" |{{Monstro|id=20606|monstro=<br>Holy Frus}}{{monster|id=20606 Holy Frus}} | ||
| | | style="vertical-align:bottom; text-align:center" |{{Monstro|id=20607|monstro=<br>Holy Skogul}}{{monster|id=20607 Holy Skogul}} | ||
|- | | style="vertical-align:bottom; text-align:center" |{{Monstro|id=20608|monstro=<br>Arch Plasma}}{{monster|id=20608 Arch Plasma}} | ||
|{{Monstro |id= | | style="vertical-align:bottom; text-align:center" |{{Monstro|id=20609|monstro=<br>Spectral Plasma}}{{monster|id=20609 Spectral Plasma}} | ||
| | |||
| | |||
|} | |} | ||
{| class="wikitable mw-collapsible mw-collapsed wikitablew-tr" style="width:80%" ; | |||
! colspan="7" style="background-color:#d5e3ff;" |Nv. 200 à 240 | |||
{| class="wikitablew-tr" style="width: | |||
|- | |- | ||
! | ! style="background-color:#d5e3ff; text-align: center; width:10%" |Nível | ||
! style="background-color:#d5e3ff; text-align: center; width:10%" |Onde Upar | |||
! colspan="5" style="background-color:#d5e3ff; text-align: center;" |Mobs | |||
| | |||
|- | |- | ||
!200 à 240 | |||
!Niflheim Dungeon 01 | |||
| | (requer Nv. 200) | ||
| style="vertical-align:bottom; text-align:center" |{{Monstro|id=20938 |monstro=<br> Ghost Cube}} | |||
|{{Monstro |id= | | style="vertical-align:bottom; text-align:center" |{{Monstro|id=20939 |monstro=<br> Lude Gal}} | ||
| style="vertical-align:bottom; text-align:center" |{{Monstro|id=20937 |monstro=<br> Brutal Murderer}} | |||
| style="vertical-align:bottom; text-align:center" |{{Monstro|id=20935 |monstro=<br> Gan Ceann}} | |||
|- | |||
| | |||
|- | |||
| | |||
|- | |||
| | |||
|} | |} | ||
{| class="wikitable mw-collapsible mw-collapsed wikitablew-tr" style="width:80%" ; | |||
! colspan="7" style="background-color:#d5e3ff;" |Nv. 240 à 250 | |||
{| class="mw-collapsible mw-collapsed" style=" | |||
! style="background-color:# | |||
|- | |- | ||
! style="background-color:#d5e3ff; text-align: center; width:10%" |Nível | |||
! style="background-color:#d5e3ff; text-align: center; width:10%" |Onde Upar | |||
! colspan="5" style="background-color:#d5e3ff; text-align: center;" |Mobs | |||
|- | |- | ||
! | !rowspan="2" |240 ~ 250 | ||
! | !Clock Tower | ||
| style="vertical-align:bottom; text-align:center" |{{Monstro|id=20175|monstro=<br>Extra Joker}}{{monster|id=20175 Extra Joker}} | |||
| style="vertical-align:bottom; text-align:center" |{{Monstro|id=20176|monstro=<br>Erzsebet}}{{monster|id=20176 Erzsebet}} | |||
| style="vertical-align:bottom; text-align:center" |{{Monstro|id=20177|monstro=<br>Jennifer}}{{monster|id=20177 Jennifer}} | |||
| style="vertical-align:bottom; text-align:center" |{{Monstro|id=20178|monstro=<br>General Orc}}{{monster|id=20178 General Orc}} | |||
| style="vertical-align:bottom; text-align:center" |{{Monstro|id=20179|monstro=<br>Sieglouse}}{{monster|id=20179 Sieglouse}} | |||
|- | |- | ||
|} | |} | ||
{| class="wikitable mw-collapsible mw-collapsed wikitablew-tr" style="width:80%" ; | |||
! colspan="7" style="background-color:#d5e3ff;" |Nv. 250 à 260 | |||
{| class="wikitablew-tr" style="width: | |||
! | |||
| | |||
|- | |- | ||
| | ! style="background-color:#d5e3ff; text-align: center; width:10%" |Nível | ||
| | ! style="background-color:#d5e3ff; text-align: center; width:10%" |Onde Upar | ||
! colspan="5" style="background-color:#d5e3ff; text-align: center;" |Mobs | |||
|- | |- | ||
|{{Monstro |id= | !rowspan="2" |250 à 260 | ||
| | !Mjolnir Underground Cave | ||
| | (requer Nv. 230) | ||
| style="vertical-align:bottom; text-align:center" |{{Monstro|id=21951|monstro=<br>Punch Bug}}{{monster|id=21951 Punch Bug}} | |||
| style="vertical-align:bottom; text-align:center" |{{Monstro|id=21953|monstro=<br>Dispol}}{{monster|id=21953 Dispol}} | |||
| style="vertical-align:bottom; text-align:center" |{{Monstro|id=21952|monstro=<br>Aferde}}{{monster|id=21952 Aferde}} | |||
| style="vertical-align:bottom; text-align:center" |{{Monstro|id=21954|monstro=<br>Timbers}}{{monster|id=21954 Timbers}} | |||
|- | |- | ||
||{{Monstro |id= | !Power Twisted Plains | ||
| | (requer Nv. 230) | ||
| | | style="vertical-align:bottom; text-align:center" |{{Monstro|id=21947|monstro=<br>Deadsera}}{{monster|id=21947 Deadsera}} | ||
| style="vertical-align:bottom; text-align:center" |{{Monstro|id=21948|monstro=<br>Hardrock Titan}}{{monster|id=21948 Hardrock Titan}} | |||
| style="vertical-align:bottom; text-align:center" |{{Monstro|id=21949|monstro=<br>Deadween}}{{monster|id=21949 Deadween}} | |||
| style="vertical-align:bottom; text-align:center" |{{Monstro|id=21946|monstro=<br>Burning Night}}{{monster|id=21946 Burning Night}} | |||
|} | |} | ||
{| class="wikitable mw-collapsible mw-collapsed wikitablew-tr" style="width:80%" ; | |||
! colspan="13" style="background-color:#d5e3ff;" |Nv. 260 à 275 | |||
{| class="mw-collapsible mw-collapsed | |||
! | |||
|- | |- | ||
| | ! style="background-color:#d5e3ff; text-align: center; width:10%" |Nível | ||
| | ! style="background-color:#d5e3ff; text-align: center; width:10%" |Onde Upar | ||
| | ! colspan="11" style="background-color:#d5e3ff; text-align: center;" |Mobs | ||
|- | |- | ||
|{{Monstro |id= | !rowspan="2" |260 à 275 | ||
| | !Niflheim Pumpkin Farm | ||
|{{monster|id= | (requer Nv. 230) | ||
| style="vertical-align:bottom; text-align:center" |{{Monstro|id=22383|monstro=<br>Violen}}{{monster|id=22383 Violen}} | |||
| style="vertical-align:bottom; text-align:center" |{{Monstro|id=22384|monstro=<br>Violen}}{{monster|id=22384 CP_Violen}} | |||
| style="vertical-align:bottom; text-align:center" |{{Monstro|id=22385|monstro=<br>Spiding}}{{monster|id=22385 Spiding}} | |||
| style="vertical-align:bottom; text-align:center" |{{Monstro|id=22386|monstro=<br>Spiding}}{{monster|id=22386 CP_Spiding}} | |||
| style="vertical-align:bottom; text-align:center" |{{Monstro|id=22387|monstro=<br>Garling}}{{monster|id=22387 Garling}} | |||
| style="vertical-align:bottom; text-align:center" |{{Monstro|id=22388|monstro=<br>Garling}}{{monster|id=22388 CP_Garling}} | |||
| style="vertical-align:bottom; text-align:center" |{{Monstro|id=22389|monstro=<br>Jackonette}}{{monster|id=21952 Jackonette}} | |||
| style="vertical-align:bottom; text-align:center" |{{Monstro|id=22390|monstro=<br>Jackonette}}{{monster|id=22390 CP_Jackonette}} | |||
| style="vertical-align:bottom; text-align:center" |{{Monstro|id=22391|monstro=<br>Liamette}}{{monster|id=22391 Liamette}} | |||
| style="vertical-align:bottom; text-align:center" |{{Monstro|id=22392|monstro=<br>Liamette}}{{monster|id=22392 CP_Liamette}} | |||
| style="vertical-align:bottom; text-align:center" |{{Monstro|id=22394|monstro=<br>Nightmare Piamette}}{{monster|id=22394 Nightmare Piamette}} | |||
'''MVP''' | |||
|- | |- | ||
!Ancient Temple Akhet | |||
(requer Nv. 250) | |||
| style="vertical-align:bottom; text-align:center" |{{Monstro|id=22395|monstro=<br>Medjed}}{{monster|id=22395 Medjed}} | |||
| style="vertical-align:bottom; text-align:center" |{{Monstro|id=22396|monstro=<br>Medjed}}{{monster|id=22396 CP_Medjed}} | |||
| style="vertical-align:bottom; text-align:center" |{{Monstro|id=22401|monstro=<br>Heka}}{{monster|id=22401 Heka}} | |||
| style="vertical-align:bottom; text-align:center" |{{Monstro|id=22402|monstro=<br>Heka}}{{monster|id=22402 CP_Heka}} | |||
| style="vertical-align:bottom; text-align:center" |{{Monstro|id=22397|monstro=<br>Medjay}}{{monster|id=22397 Medjay}} | |||
| style="vertical-align:bottom; text-align:center" |{{Monstro|id=22398|monstro=<br>Medjay}}{{monster|id=22398 CP_Medjay}} | |||
| style="vertical-align:bottom; text-align:center" |{{Monstro|id=22399|monstro=<br>Ophois}}{{monster|id=22399 Ophois}} | |||
| style="vertical-align:bottom; text-align:center" |{{Monstro|id=22400|monstro=<br>Timbers}}{{monster|id=22400 CP_Ophois}} | |||
| style="vertical-align:bottom; text-align:center" |{{Monstro|id=22404|monstro=<br>Guide of Dead}}{{monster|id=22404 Guide of Dead}} | |||
'''MVP''' | |||
! | |||
| | |||
| | |||
|{{Monstro |id= | |||
| | |||
| | |||
| | |||
| | |||
|{{Monstro |id= | |||
| | |||
| | |||
|{{Monstro |id= | |||
| | |||
|{{Monstro |id= | |||
| | |||
|{{Monstro |id= | |||
| | |||
| | |||
|{{Monstro |id= | |||
| | |||
| | |||
|{{Monstro |id= | |||
|} | |} | ||
</center> | </center> | ||
Edição atual desde as 02h52min de 18 de março de 2026
Nesse guia de UP vocês vão encontrar um guia simples porém prático de como e quais mapas ir para que você possa upar. Lembrando que dependendo da sua classe você pode ter mais facilidade ou dificuldade dependendo do mapa.
Você não precisa obrigatoriamente seguir esse guia, você pode ser livre pra fazer a rota de UP que preferir!
Foque de preferencia os monstros citados no guia, pois são os de maior custo benefício.
Dicas de UP
- Divisão de XP: A diferença de divisão de experiência é de 15 níveis.
- Equipamentos/Itens de XP: Use e abuse de equipamentos e consumíveis que te fornecerão um maior ganho de experiência.
- Spawn dos Monstros: Os seguintes comandos podem te ajudar na hora de procurar o monstro ideal pra você caçar.
- @mi (Nome do Monstro ou ID): Mostra informações detalhadas de um determinado monstro.
- @whodrops (Nome do Item ou ID): Mostra uma lista de monstros que derrubam um determinado item, e a chance.
- Navegação: O que está sendo dito nesse guia é apenas uma SUGESTÃO, e vocês podem procurar mapas e mobs por conta própria. Para isso use e abuse do Sistema de Navegação.
- Na barra de pesquisa utilize
$$lv<X>~<Y>, onde o X deve ser trocado pelo nível inicial e o Y pelo nível final, dessa forma o sistema irá procurar todos monstros entre nível X e Y escolhido, como no exemplo$$lv50~60 - Depois de escolher o mapa/monstro, basta clicar em
TELEPORTARque você será teleportado para o mapa escolhido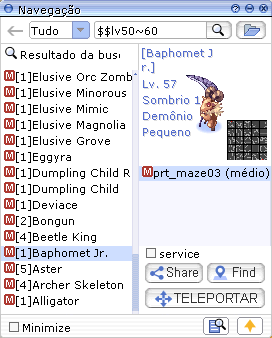
- Na barra de pesquisa utilize

 Medicina Milagrosa é possível chegar no nível de base 100+ rápidamente.
| Nv. 1 à 50 | ||||||
|---|---|---|---|---|---|---|
| Nível | Onde Upar | Mobs | ||||
| 1 ~ 50 | Campo de Aprendiz |  |
 |
|||
| Formigueiro Infernal |  |
 |
 |
 |
 | |
| Nv. 50 à 70 | ||||
|---|---|---|---|---|
| Nível | Onde Upar | Mobs | ||
| 50 ~ 70 | Caverna dos Orcs 2 |  |
 |
 |
| Deserto de Sograt 16 |  |
 |
 | |
| Nv. 70 à 130 | ||||
|---|---|---|---|---|
| Nível | Onde Upar | Mobs | ||
| 70 ~ 100 | Carna de Payon bRO |  |
 | |
| Carna de Payon iRO |  |
 | ||
| 101 ~ 125 | Calabouço de Geffen bRO |  |
 | |
| Calabouço de Geffen iRO |  |
 | ||
| 126 ~ 150 | Lago do Abismo bRO |  |
 | |
| Lago do Abismo iRO |  |
 | ||
| Nv. 130 à 170 | |||||||
|---|---|---|---|---|---|---|---|
| Nível | Onde Upar | Mobs | |||||
| 130~170 | Large Bath |  |
 |
 |
 |
 |
 |
| Illusion of Underwater 01
(Quests e Mobs) |
 |
 |
 |
 |
 | ||
| Nv. 130+ | |||||||||||
|---|---|---|---|---|---|---|---|---|---|---|---|
| Nível | Onde Upar | Mobs | |||||||||
| 130~170 | Carva de Magma (3) |  |
 |
 |
 |
 |
 |
 |
 MVP | ||
A partir do nível 170+ você pode realizar as instâncias Old Glast Heim Challenge e Edda Bio Lab pelo gerenciador de instâncias. (Não esqueça de dar o @classe no nível 200, geralmente você termina as instâncias proximo do Nv. 230)
| Nv. 230+ | ||||||||||||
|---|---|---|---|---|---|---|---|---|---|---|---|---|
| Nível | Onde Upar | Mobs | ||||||||||
| 230+ | Niflheim Pumpkin Farm
(requer Nv. 230) |
 |
 |
 |
 |
 |
 |
 |
 |
 |
 |
 MVP |
| Nv. 170 à 180 | |||||||||
|---|---|---|---|---|---|---|---|---|---|
| Nível | Onde Upar | Mobs | |||||||
| 170 à 180 | Illusion of Labyrinth
(Lembre-se de pegar a quest no livro de ouro) |
 |
 |
 |
 |
 |
 |
 |
 |
| Rachel Oz Gorge |  |
 |
 |
||||||
| Illusion of Underwater 02
(Quests e Mobs) |
 |
 |
 |
 |
 |
||||
| Nv. 180 à 200 | |||||||||
|---|---|---|---|---|---|---|---|---|---|
| Nível | Onde Upar | Mobs | |||||||
| 180 à 200 | Odin's Past
(requer Nv. 170) |
 |
 |
 |
 |
 |
 | ||
| Nv. 200 à 240 | ||||||
|---|---|---|---|---|---|---|
| Nível | Onde Upar | Mobs | ||||
| 200 à 240 | Niflheim Dungeon 01
(requer Nv. 200) |
 |
 |
 |
 | |
| Nv. 240 à 250 | ||||||
|---|---|---|---|---|---|---|
| Nível | Onde Upar | Mobs | ||||
| 240 ~ 250 | Clock Tower |  |
 |
 |
 |
 |
| Nv. 250 à 260 | ||||||
|---|---|---|---|---|---|---|
| Nível | Onde Upar | Mobs | ||||
| 250 à 260 | Mjolnir Underground Cave
(requer Nv. 230) |
 |
 |
 |
 | |
| Power Twisted Plains
(requer Nv. 230) |
 |
 |
 |
 | ||
| Nv. 260 à 275 | ||||||||||||
|---|---|---|---|---|---|---|---|---|---|---|---|---|
| Nível | Onde Upar | Mobs | ||||||||||
| 260 à 275 | Niflheim Pumpkin Farm
(requer Nv. 230) |
|
|
|
|
|
|
|
|
|
|
MVP |
| Ancient Temple Akhet
(requer Nv. 250) |
 |
 |
 |
 |
 |
 |
 |
 |
 MVP | |||